If you have lived in Denver for any length of time, you know our city asks a lot of its chimneys. From those bluebird winter mornings after a powder day to the high-altitude summer sun that bakes masonry, the materials that vent your fireplace or stove work harder here than they do at sea level. So when neighbors start comparing the idea of “chimney inspection cost per foot,” they are really trying to make sense of how height, access, and complexity influence the attention a stack needs. As a local inspector who has climbed and scoped flues from Berkeley bungalows to Wash Park Tudors, I want to demystify what that phrase means in practice without getting tangled up in dollar figures. I’ll explain the factors that shape the workload on every vertical foot and how to interpret professional proposals in a way that protects your home, your roof, and your peace of mind. If you decide it’s time to schedule, you can explore trusted local chimney inspection services as a smart first step.
Think of the “per-foot” conversation as a shorthand for scale and effort. A taller chimney that rises above a steep, slick roof takes more time and safety planning than a short, easily accessed flue attached to a single-story ranch. The phrase also hints at what is being examined at each vertical section: brick or block courses, mortar joints, crown and cap conditions, flue tiles or metal liners, and the transitions where problems love to hide. In Denver’s dry climate, we see thermal cycling and freeze-thaw stress concentrate at particular heights, especially where snow drifts at parapets or where wind scours away protective coatings.
What “per foot” actually represents on a Denver chimney
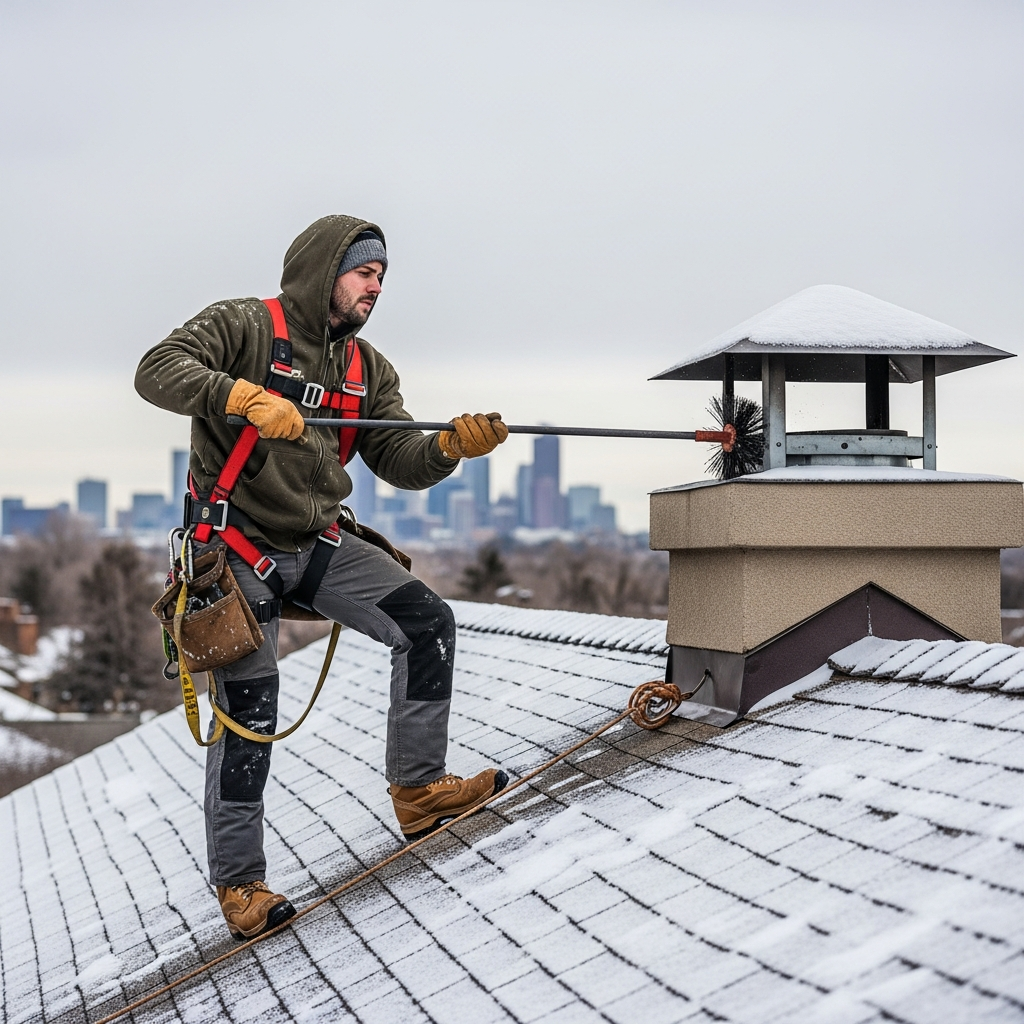
When professionals discuss workload by the foot, they’re usually capturing more than just measurement. It bundles roof access, ladder setup, fall protection, and the time required to move carefully from the crown to the smoke chamber and firebox. Every foot of height adds a little more exposure to wind, complexity with equipment staging, and the need to document conditions thoroughly. The methodical pace is important. An experienced inspector stops to observe not just the obvious brick and flue surfaces but also hidden transitions—places where a liner changes size, a flue merges from multiple appliances, or a chase cover meets siding. In older Denver neighborhoods, those transitions can be charming but tricky, and they reward detailed, photo-supported documentation.
Another element folded into the per-foot idea is the interior journey. Camera systems travel the same distance, from the top down or the bottom up, pausing at every tile junction or seam. If your flue is tall, expect more camera handling, more stops to rotate and focus, and more notes. That thoroughness is exactly what you want, because subtle flaws—hairline liner cracks, eroded mortar at a tile joint, or a warped metal seam—often live in the middle sections, far from easy view.
Denver-specific variables that shape inspection workload
Our elevation amplifies sun, wind, and daily temperature swings. Masonry breathes and contracts with that rhythm, and so do metal components. On south- and west-facing stacks, UV and thermal stress accelerate crown wear and cap corrosion. On north slopes, persistent shade allows snow to linger, which means more freeze-thaw cycles around the shoulder of the chimney where water can infiltrate tiny voids. The point is simple: the Denver climate pushes specific failure patterns that require slow, careful eyes, foot by foot.
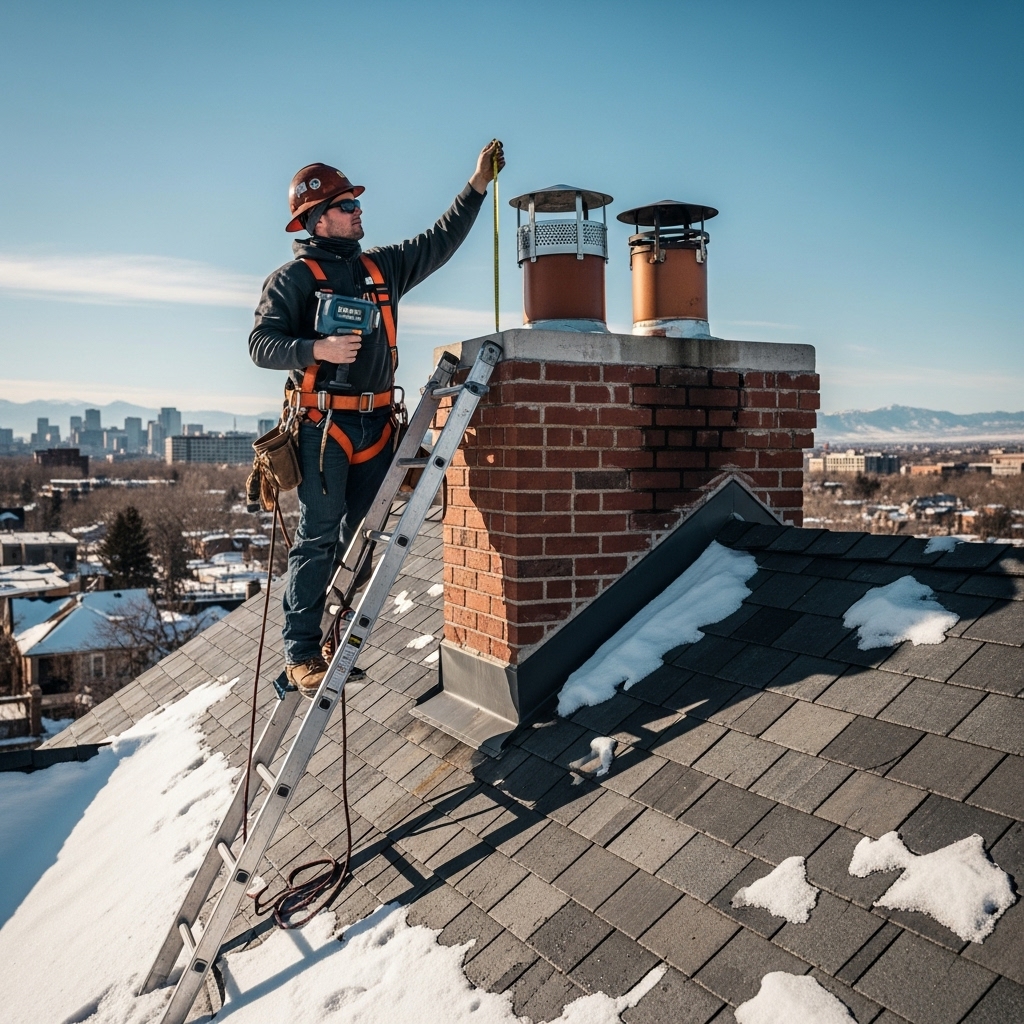
Roof geometry compounds the picture. A 12/12 pitch Victorian in Capitol Hill is a circumnavigation compared with a modern low-slope addition in Highland. Every change in pitch or transition across dormers and valleys adds minutes to the approach, and that time is not fluff—it’s safety, setup, and teardown. The “per-foot” shorthand is one way pros account for that reality while maintaining consistent standards of care.
Material, liners, and multi-flue configurations
Masonry chimneys with clay tile liners behave differently than factory-built, metal-lined systems. In masonry, each tile joint is a potential stress point. The taller the flue, the more joints to check, and the more opportunities to encounter shifted sections or voids in parging. In metal systems, long runs mean more sections, more seams, and more hangers and supports that must be verified. Multi-flue stacks—say, a fireplace plus a boiler or water heater—multiply the complexity because each flue has its own story, drafting pattern, and maintenance history.
Chimneys that pass through interior living space before breaching the roof tend to remain warmer and move gases differently than exterior chases. That affects condensation and creosote levels, which in turn changes what the inspector expects to find at various heights. Again, the concept of effort per foot is a proxy for these nuanced realities, not a mere measurement on a tape.
Inspection levels and how they relate to effort
In Colorado, reputable inspectors align their process with national standards that define Level I, Level II, and Level III examinations. A routine annual review of a readily accessible system is not the same as a post-event assessment after a flue fire or a real estate transfer where areas normally concealed become fair game with the owner’s permission. The level dictates how much disassembly, access, and documentation are appropriate. Taller and more complex stacks take longer to assess at each level, which is why conversations about “per-foot” can’t be divorced from the scope of the inspection itself.
Tools and technology that follow every vertical foot
Modern chimney inspections rely on specialized cameras, high-lumen lighting, measuring tools, and moisture meters, all choreographed around safe roof work. On many Denver homes—especially those with rooftop decks or tight setbacks—staging that equipment is the slow, careful part. Video capture from the crown to the smoke shelf must be steady and complete to be useful. The same goes for photographs of crowns, caps, flashing, and counterflashing, where wind-driven precipitation tends to sneak under metal and stain interior walls months later. If you are weighing options, remember that thorough documentation is what helps you make informed choices. In the middle of your research, reviewing local chimney inspection services can help you see what a complete, photo-rich report looks like before anyone sets a ladder.
Seasonality and scheduling in the Front Range
It’s common to see a rush each fall, but spring and summer can be ideal for inspections. Warmer weather makes roof work safer and more predictable, and any recommended maintenance can be completed without rushing against the first cold snap. Our afternoon thunderstorms and gusty winds do, however, change day-of plans. Responsible inspectors will reschedule rather than risk a slick roof or a lightning threat. When that happens, it’s not about inconvenience; it’s about ensuring the careful, methodical work that finds issues other eyes might miss.
Snow and ice present their own rhythm. A chimney can look fine at a glance after a storm, yet meltwater refreezing along flashing can tell a different story when viewed up close. That’s one reason Denver homeowners who schedule outside the fall rush often enjoy more flexible appointment windows and more thorough walk-throughs.
Permits, codes, and the Denver context
While an inspection itself doesn’t require a permit, any corrective work that alters the structure or venting path can trigger code and permitting considerations. Denver follows model codes with local amendments, and inspectors reference industry standards when evaluating clearances to combustibles, liner integrity, and termination heights relative to the roof. In practical terms, that means your report should translate standards into plain English: what was observed, why it matters, and what next steps will return the system to safe operation. In tall or complex stacks, a few extra feet of height can influence how a termination meets clearance rules above the roof plane, so details at the crown are more than just cosmetic.
What to expect during the appointment
A good inspection starts with a conversation at your hearth. The inspector will ask about the home’s heating history, any smoke spillage, odors, or previous repairs. Then, they’ll move deliberately: exterior observation from grade, roof access with safety gear, crown and cap assessment, and camera work through the flue. Inside, expect a look at the smoke chamber, damper, firebox, and surrounding materials. Debris management matters too; drop cloths, shoe covers, and containment keep your living room clean. The final step is a walkthrough of initial findings—what was seen and why it matters—followed by a written report.
That report should be more than a checklist. It should include images with arrows or captions, plain-language explanations, and prioritized recommendations. When a chimney is taller or has multiple flues, the report will naturally be longer, reflecting the per-foot observation points that were documented.
How to compare “per-foot” proposals without chasing numbers
When you receive quotes, look for clarity on access, safety planning, the inspection level, and deliverables. Does the scope include roof access and crown evaluation? Will camera footage and photos be provided? Are all connected appliances and flues included? Are return visits built in if weather interrupts? These quality markers tell you more about value than a bare “per-foot” figure. The best provider for your home is the one whose process you understand and trust.
It also helps to ask how the company handles surprises. If the flue is partially blocked, will they pause the inspection to discuss? If the crown is unsafe to approach, what’s the contingency? A transparent plan beats a low headline number every time, because it protects you from rushed work and incomplete documentation.
Common misconceptions about the per-foot idea
One myth is that taller chimneys automatically mean “worse news.” Height alone doesn’t dictate condition. Many tall, interior masonry stacks in Denver perform beautifully thanks to stable temperatures and thoughtful construction, while short exterior chases around additions can suffer due to exposure and poor flashing. Another misconception is that an inspector “just looks” from the top and bottom. The reality is more akin to a guided tour through the flue’s interior, with pauses, rewinds, and careful notes at each tile or seam, precisely because each foot can hold a clue.
How Denver’s housing stock influences inspection detail
From 1920s brick bungalows to new townhomes with rooftop patios, Denver’s variety keeps inspectors on their toes. In older homes, we watch for aging mortar, original tiles with historical quirks, and modifications made during past renovations. In newer construction, we verify factory-built components, chase cover fitment, and whether modern vents share spaces with architectural features. The “per-foot” workload grows where details are dense, and in Denver, details are the norm.
Why documentation is your best friend
After the ladders are down and the equipment is packed, the documents remain. A good report helps you plan, talk with your contractor if work is needed, and reassure buyers or insurers that your system was evaluated by the book. For taller chimneys, the granularity of that documentation becomes even more important, because it is the only way to capture the condition of mid-span sections most people will never see firsthand.
Preparing your home for a smoother inspection
Small steps make a big difference. Clear a path to the fireplace or stove. If you have pets, arrange a safe, quiet space for them. Move patio furniture away from roof access points if possible. Share anything you know about prior work or peculiar behaviors—smoke on windy days, odors after rain, or birds visiting the cap in spring. The more context your inspector has, the more targeted and insightful the examination can be, foot by foot.
When a follow-up makes sense
Sometimes the most responsible move is a second look after minor maintenance or once snow clears from a tricky roof. Think of it as finishing the last chapter of the story. With complex systems, a staged approach avoids rushing and produces better documentation. It’s all part of respecting the realities of Denver roofs, weather, and architecture.
Questions to keep in your back pocket
Before the ladder goes up, ask how the inspector plans to approach your particular roof, what they expect to find given your home’s age and style, and how they will communicate findings. A thoughtful answer signals a thoughtful inspection. And if you are still feeling out your options, browsing local chimney inspection services can help you calibrate expectations about scope and reporting quality.
What factors affect the workload on each foot of chimney height?
Roof pitch, access points, weather on the day of service, and the chimney’s construction all matter. A steep roof with limited ladder staging, an exterior chase that sees heavy freeze-thaw, or a tall multi-flue stack can require more time and careful documentation at each section. Inside the flue, the number of tile joints or metal seams dictates how often the camera should pause to inspect and photograph details. These factors compound as height increases, so “per-foot” is really a proxy for effort, safety, and thoroughness.
How do inspection levels change what gets examined?
Level I is a basic visual review of readily accessible areas, Level II adds internal video scanning and accessible attic or crawlspace checks, and Level III allows for limited removal of components when necessary to reach concealed areas. Taller or more complex chimneys can take longer at each level, simply because there are more surfaces, joints, and transitions to evaluate. Your inspector should explain which level fits your situation and why.
Is a tall chimney automatically a problem in Denver’s climate?
No. Height alone doesn’t make a chimney vulnerable. Many tall interior stacks perform very well. What matters is exposure, construction quality, and maintenance. Exterior chimneys with lots of wind and snow exposure, inadequate flashing, or poor crowns are more likely to need attention, regardless of height.
What should a good inspection report include?
Expect clear, well-lit photos; video or stills from inside the flue; descriptions in plain language; and recommendations prioritized by safety and function. For multi-flue or tall systems, the report should distinguish findings by flue and by location so that future maintenance can target the right areas without guesswork.
When is the best time in Denver to schedule an inspection?
Spring and summer are excellent because roofs are safer and any recommended maintenance can be completed before the first cold snap. Fall is always busy, and winter weather can delay roof access. If you have flexibility, shoulder seasons often allow for calmer scheduling and longer on-site conversations.
How can I prepare my home for a smooth inspection?
Clear access to the hearth, move outdoor obstacles near roof access, share any history or symptoms you’ve noticed, and secure pets. A little preparation speeds the process and lets your inspector focus on detailed documentation rather than logistics.
If you are ready to put these ideas into action and want a careful, photo-rich evaluation tailored to Denver’s roofs, weather, and building styles, reach out to a local team that treats every foot of your chimney with respect. You can start the process today by exploring professional chimney inspection services, then book with confidence knowing you’ll receive a clear, actionable report.